⚡ Quick Answer: How to Trim Dog Nails Safely
Isolate one toe, squeeze the paw pad to extend the nail, and cut only the tip at a 45-degree angle. Avoid the quick — the pink vascular center visible in light nails. For black nails, take tiny slices and stop when the center looks dark or moist.
- Calm your dog with treats and praise first
- Hold the paw gently but securely
- Isolate and squeeze one toe to extend the nail
- Cut at 45 degrees — tip only, never deep
- Smooth rough edges with a grinder or file
- Reward after every single nail
Dog nail trimming is the single most skipped home grooming task — and the consequences are more serious than most owners realize. Overgrown nails change a dog’s gait, create chronic joint stress, and cause real pain over time. When nails are too long, the dog’s toes are forced upward with every step, redistributing weight abnormally across the entire limb — eventually affecting the hips, knees, and spine. This is not cosmetic. It is orthopedic.
This guide gives you the complete system: the right tools, the correct technique for every nail type, how to manage a dog that hates nail trims, and — critically — how to handle anxiety so that trimming becomes a calm routine instead of a twice-monthly battle. We also cover the best products that make the process faster, safer, and less stressful for both of you.
Why You Must Trim Your Dog’s Nails Regularly
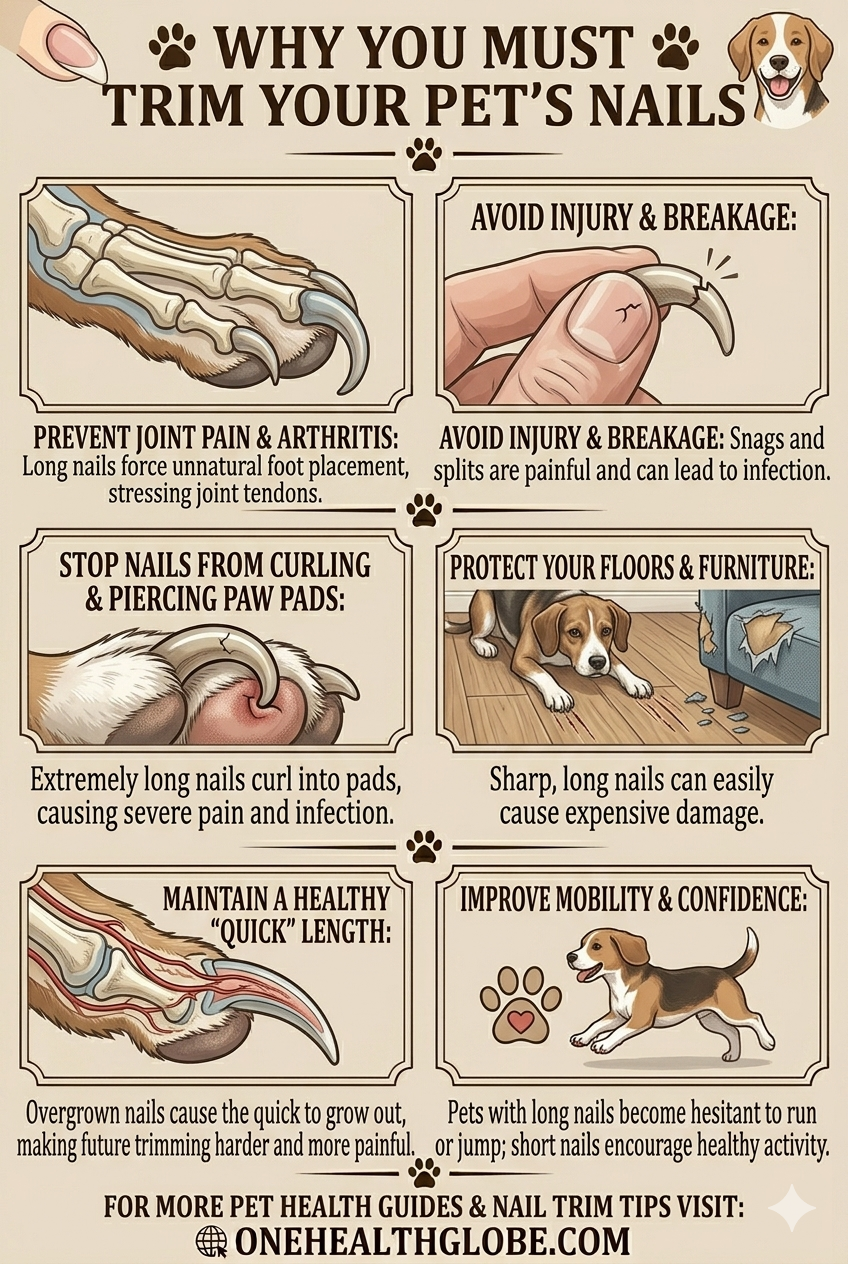
Overgrown dog nails press into the ground with every step — forcing the toe joints to splay and twist abnormally. Over months, this creates chronic inflammation in the toe joints, alters the dog’s center of gravity, and adds compressive strain to the knees and hips. In senior dogs, this significantly accelerates the arthritis that is already developing. In younger dogs, it creates postural problems that can become permanent.
Dog Nail Tools: Which One Is Right for Your Dog?
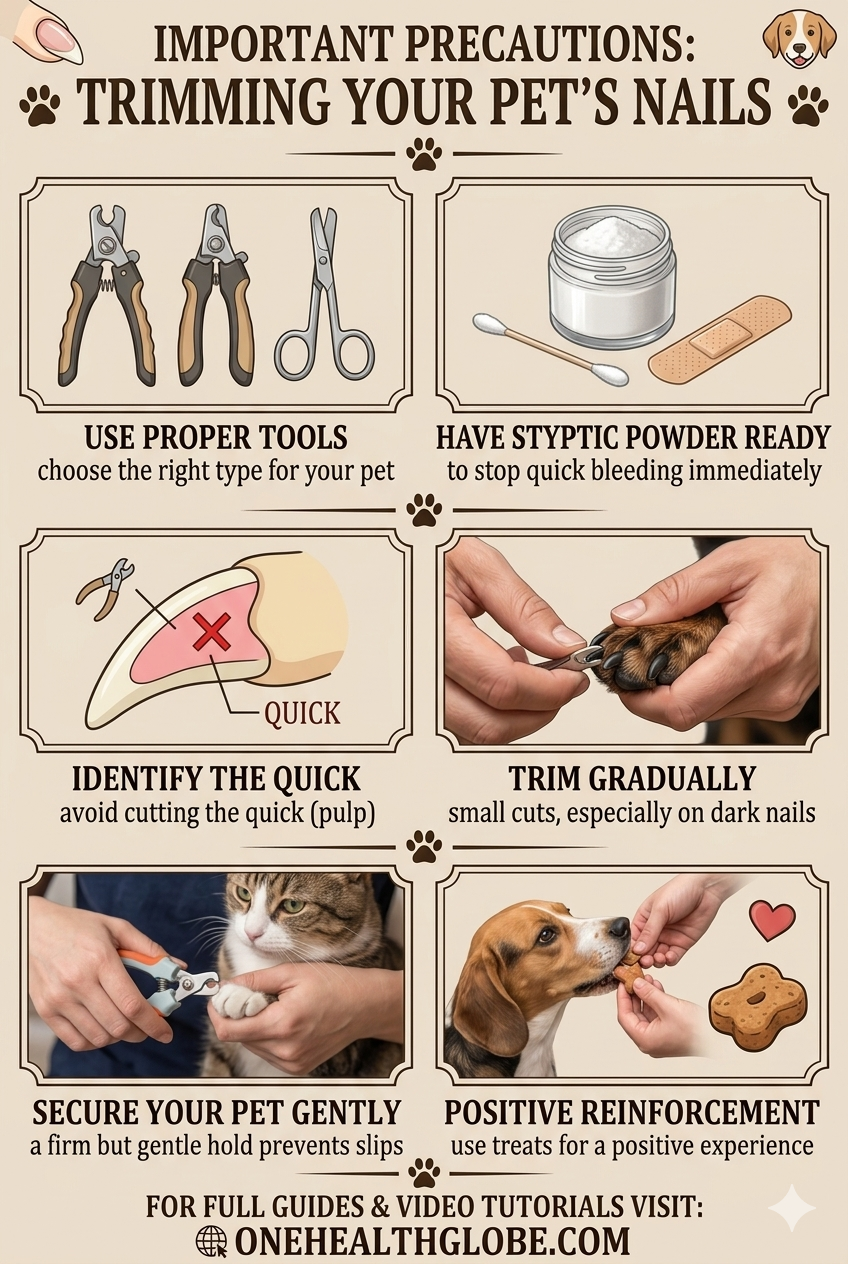
The tool matters enormously. Using dull, wrong-sized, or poorly designed clippers causes the nail to crush and split rather than cut cleanly — creating pain even when the quick is not touched. Here is the complete 2026 breakdown:
Best Dog Nail Grooming Products (2026) — At a Glance
| Product | Best For | Rating | Type | Link |
|---|---|---|---|---|
| Dutch Pet Calming Rx🏆 #1 Anxious Dogs | Dogs that hate nail trims — prescription calming before session | ⭐ 4.9/5 | Prescription Rx | Get Rx → |
| Bailey’s CBD Calming Oil | Pre-trim anxiety — reduces cortisol 30–60 min before | ⭐ 4.8/5 | CBD Oil | Shop → |
| Dutch Pet Vet Skin & Coat | Post-trim paw care — vet-formulated paw & coat health | ⭐ 4.7/5 | Rx Skin Care | Shop → |
| Ruff Greens VitaSmart | Nail strength & coat health — Biotin, Zinc, Omega-3s | ⭐ 4.5/5 | Daily Supplement | Free Trial → |
| Neakasa Pet Grooming Kit | Complete at-home grooming — vacuum + clipper + grinder | ⭐ 4.6/5 | Grooming Kit | Shop → |
How Often Should You Trim Dog Nails?
| Dog Type | Recommended Frequency | Notes |
|---|---|---|
| Indoor dogs | Every 2–3 weeks | No pavement wear — nails grow faster without natural filing |
| Active outdoor dogs | Every 3–5 weeks | Pavement naturally files nails — check front feet more often than rear |
| Senior dogs | Every 2–4 weeks | Reduced activity = less natural wear; arthritis makes long nails more painful |
| Puppies | Every 1–2 weeks | Small frequent trims build positive association + keep sharp tips from scratching |
| Overgrown nails | Weekly small trims | Gradual shortening allows the quick to recede safely over 4–8 weeks |
| Dewclaws | Same schedule as other nails | Dewclaws don’t touch ground — never wear naturally, curl fastest |
Step-by-Step: How to Cut Dog Nails at Home (Beginner-Safe)
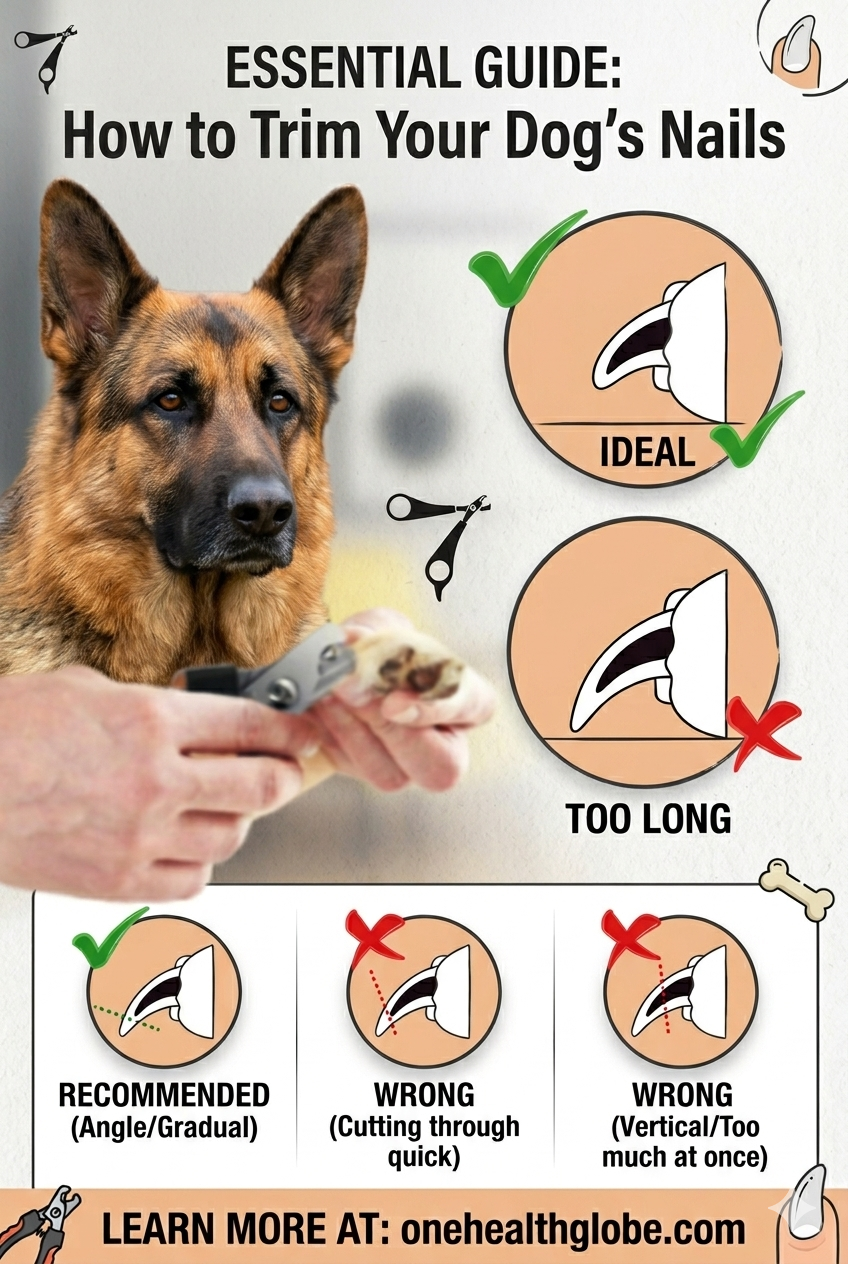
- Prepare your station. Gather your clippers or grinder, a bag of small treats, and styptic powder within arm’s reach. Good lighting is essential — trim in daylight or under a bright lamp. Lay a non-slip mat on the surface where your dog will sit.
- Calm your dog first — before you touch the nails. Spend 2–3 minutes petting your dog, using a calm voice, and giving treats just for being relaxed. Never start a nail trim when your dog is already anxious or over-excited. If your dog has severe pre-trim anxiety, give Bailey’s CBD Calming Oil 30–60 minutes before starting — see Product #1 below.
- Hold the paw gently but confidently. Grasp one paw and apply steady gentle pressure. Do not grip so tightly that it causes discomfort, but hold firmly enough that the dog does not jerk the paw away. For medium and large dogs, it helps to have the dog lying on their side.
- Isolate one toe at a time. Use your thumb and index finger to gently separate one toe. Squeeze the paw pad slightly to extend the nail fully — this makes the quick and the nail tip much easier to see and access.
- Identify the quick before cutting. In light-colored nails, the quick is visible as a pink area inside the nail. Cut the white tip below the pink — the safe zone is typically 2–3mm from where the pink begins. For dark or black nails, see the dedicated section below.
- Cut at a 45-degree angle, tip only. Position clippers at 45 degrees to the nail axis and cut the sharp tip in one clean, confident motion. Never saw back and forth — one clean squeeze is cleaner and less traumatic than multiple partial cuts.
- Smooth rough edges immediately. A freshly cut nail has a sharp edge that can scratch skin, snag carpet, and cause discomfort. Use a nail file, emery board, or grinder to smooth the cut surface into a slightly rounded shape.
- Reward after every nail. Give a small treat and verbal praise after each nail — not just at the end. This tells your dog that each nail = a reward, making the session progressively calmer as it continues.
How to Trim Black Dog Nails Without Making Them Bleed
Black dog nails are more challenging because the quick is completely invisible through the pigmented nail. The #1 mistake owners make is trying to cut the same amount from a black nail as from a white nail. For black nails, precision and patience replace guesswork.
The Thin-Slice Method for Black Nails
- Start at the very tip. Take your first cut removing only 1–2mm from the absolute tip of the nail. Less than you think you need to take.
- Look at the cross-section after every cut. After each slice, look directly at the flat face of the cut nail. Early cuts will show a chalky white or grey center — this is nail material only, well away from the quick.
- Watch for the dark dot. As you approach the quick, the center of the nail cross-section will change: it will appear darker (grey to black), look slightly moist, or show a small circular dark dot at the center. This is your stop signal.
- Stop at the first sign of the dark center. Do not cut further. You are 1–2mm from the quick. The nail is now safely short.
- Use a grinder for maximum precision. A nail grinder removes material even more gradually than clippers, giving you the most control over black nail length. Many experienced owners use clippers to remove the bulk and a grinder to finish safely.
How to Trim Overgrown Dog Nails Safely
Overgrown nails present a specific challenge: the quick grows with the nail. A nail that has been long for months has a quick extending much further toward the tip than a regularly maintained nail. Attempting to cut overgrown nails short in a single session will almost certainly cause bleeding and pain.
The solution is the Gradual Regression Protocol: trim only the tip once per week for 4–8 weeks. Each weekly trim stimulates the quick to recede slightly — typically 1–2mm per week. After 6–8 weeks of weekly small trims, the quick will have receded enough to allow a significantly shorter nail length safely.
- Week 1–2: Trim only the very tip (1–2mm). The quick will not bleed but will be stimulated.
- Week 3–4: You can begin to take slightly more — up to 3mm — as the quick recedes.
- Week 5–8: The nail is now manageable. Continue regular 2–3 week maintenance schedule.
If the nail is curling into the paw pad, cracked, infected, or the dog is limping, do not attempt home trimming. Visit a veterinarian immediately — curled nails that have penetrated the pad are a medical condition requiring professional care. A Dutch Pet vet can assess your dog’s nails via video tonight and advise whether home trimming is safe or whether professional intervention is needed.
How to Trim a Nervous Dog’s Nails: The Desensitization System
A dog that hates nail trimming did not start that way. Most nail-trim anxiety is learned — from a bad early experience, from being rushed, or from a past instance of bleeding that created a fear association. The good news: it can be unlearned with patience and the right protocol.
The 5-Stage Desensitization Protocol
- Paw touch only (Day 1–3). Simply touch your dog’s paw, hold it for 2 seconds, release, and give a treat. Repeat 5–10 times per session, 2–3 sessions per day. Never touch the nails yet. The goal is “paw touching = good thing”.
- Clippers present, not touching (Day 4–7). Show your dog the clippers. Let them sniff. Tap the clippers lightly on the paw without cutting. Treat immediately. The goal is “this object is not scary”.
- One nail only (Day 8–10). Cut exactly one nail — the easiest, most accessible one on the front paw. Immediately give 3–4 small treats. End the session. Even if your dog was calm and cooperative, stop at one. Ending on a positive note before anxiety begins is the entire strategy.
- Two to three nails per session (Week 2). Once one nail per day feels routine, add a second and third nail to each session. Continue treating after every nail. One full paw per session is a complete win at this stage.
- Full nail session (Week 3–4). By now your dog’s anticipatory anxiety should be significantly reduced. A full session of all 16–18 nails with treat reinforcement throughout should be achievable without resistance.
Dutch Pet Online Vet — Best for Dogs With Severe Nail-Trim Anxiety (Prescription Calming Rx)
For dogs with significant nail-trim anxiety — trembling, aggression, or complete shutdown at the sight of clippers — over-the-counter calming supplements are often not sufficient. A Dutch Pet licensed vet can prescribe appropriate pre-procedure medications: trazodone (for generalized procedural anxiety), gabapentin (reduces anxiety and hyperalgesia in dogs with pain-associated fear), or Sileo (dexmedetomidine gel — FDA-approved specifically for noise-aversion and procedural anxiety in dogs). These are given 1–2 hours before the nail trim and dramatically reduce the physiological anxiety response.
The benefit goes beyond the immediate nail session: a calm nail-trim experience interrupts the fear-reinforcement cycle. A dog that does not panic during trimming starts to learn the procedure is not dangerous — gradually reducing the need for medication over time.
- FDA-approved Rx options: trazodone, gabapentin, Sileo gel
- 24/7 — consult tonight, Rx available before your next trim session
- No clinic stress — prescription issued via video consult
- Reduces aggression and injury risk during restraint
- Licensed US vet — not an AI chatbot
- Prescription required — requires a vet consultation first
- Pre-procedure medications should not be used as permanent substitutes for desensitization training
Bailey’s CBD Calming Oil — Best Natural Pre-Trim Anxiety Reduction for Dogs
Bailey’s CBD Calming Oil reduces cortisol (the primary stress hormone) through endocannabinoid system modulation — making it ideal as a pre-trim calming protocol for dogs with mild to moderate nail-trim anxiety that does not require prescription medication. Give 30–60 minutes before the nail session and begin with the desensitization protocol. The Cornell University study confirming 80% arthritis improvement with CBD demonstrated CBD’s real physiological impact on the canine stress and pain response — the same mechanism that makes pre-trim use effective.
- No prescription needed — available directly online
- Certified organic US hemp — no pesticides, additives, or THC
- Full-spectrum CBD — maximum cortisol reduction effect
- Oil format — easy to add to a treat or food 30–60 min before
- Third-party lab tested for potency and purity
- Non-sedating — dog remains alert and cooperative
- For severe anxiety — prescription Rx from Dutch Pet is stronger
- Takes 30–60 min to reach full effect — plan ahead
Give 30–60 minutes before nail trimming. Certified organic hemp, full-spectrum CBD, third-party tested. Reduces the cortisol response that turns nail sessions into battles. No Rx needed.
Shop Bailey’s Calming Oil →How to Stop Dog Nail Bleeding If You Cut the Quick
Cutting the quick happens even to experienced groomers — particularly with black nails. It causes a sharp sting and bleeding, but it heals quickly and causes no lasting harm when handled properly. The key is to stay calm: your anxiety will transfer to your dog and make the situation worse.
- Stay calm and reassure your dog. Use a gentle voice. Your dog’s reaction to quick-cutting is partly driven by your reaction. A calm owner = a calmer dog.
- Apply styptic powder immediately. Dip the bleeding nail directly into styptic powder or press a small amount firmly onto the nail tip. Styptic powder contains aluminum sulfate which constricts blood vessels and stops bleeding within 30–60 seconds. Kwik-Stop is the most commonly available brand.
- Apply firm gentle pressure for 30–60 seconds. Press a clean cloth or gauze against the powder-covered nail. Do not wipe — wiping removes the clotting material. Hold steady pressure.
- Keep the dog calm and off hard exercise for 30 minutes. Walking on the nail before the clot is stable can restart bleeding.
- Check the nail after 5 minutes. The bleeding should have stopped entirely. Minor staining of the dog’s fur or your floor is normal and washes out easily.
Dewclaw Trimming and Trimming Dog Paw Hair
Dewclaws are the vestigial nails located higher up on the leg — on the inner side of the front legs in most breeds, and occasionally on the rear legs. Because they do not make ground contact, dewclaws receive zero natural wear and can grow extremely fast relative to the other nails. If ignored, dewclaws curl into an arc and eventually pierce the skin of the leg — causing infection, pain, and a veterinary visit that is far more unpleasant than a simple monthly trim.
Check dewclaws at every nail trim session. Trim them using the same technique as regular nails, but be aware that dewclaws are often softer and more curved than ground-contact nails. Use small, precise cuts and smooth with a grinder.
Trimming dog paw hair serves a practical purpose beyond aesthetics: long hair between the paw pads traps moisture (promoting yeast and bacterial growth), reduces traction on smooth surfaces, and can obscure your view of the nails you are trying to trim. Use blunt-tipped scissors to carefully trim excess hair flush with the paw pads before your nail session — your visibility and safety both improve significantly.
Aftercare After Dog Nail Trimming
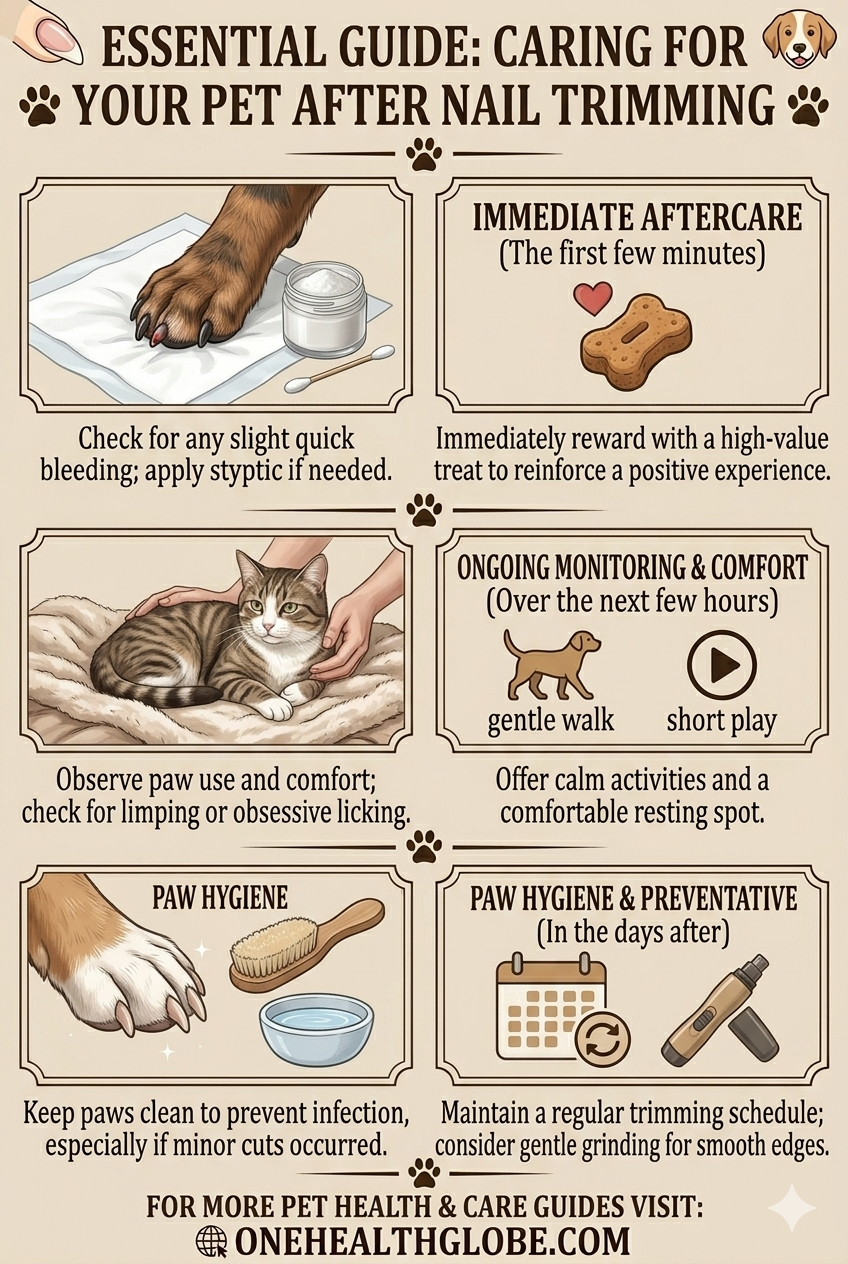
- Inspect each nail for splitting, cracking, or any residual bleeding before releasing the dog
- Smooth all sharp edges with a file or grinder — freshly cut nails are sharp and can scratch hardwood, furniture, and skin
- Reward your dog generously with their favorite treats and extended positive interaction — this is the moment that determines how the next session begins
- Check paw pads for any cuts, cracks, or irritation that may have been hidden by the fur before trimming
- Avoid rough play or hard exercise for 30–60 minutes if any nail was cut close or bled
- Apply paw balm if pads are dry or cracked — a Dutch Pet vet-formulated skin and coat product protects the paw tissue between grooming sessions
Ruff Greens VitaSmart — Best Daily Supplement for Nail Strength & Coat Health
Nail brittleness, splitting, and slow regrowth are often nutritional — not structural. Biotin (Vitamin B7), zinc, and Omega-3 fatty acids are the three primary nutrients that govern nail plate integrity, growth rate, and resistance to splitting. Deficiencies in any of these — common in dogs fed standard commercial kibble without supplementation — cause nails that shatter when clipped, split vertically, or crack at the quick. Ruff Greens VitaSmart provides all three daily in a food-topper format that takes 5 seconds to add to any meal. The free trial makes this a zero-risk investment in better nail health starting this week.
- Free trial — just $9.95 shipping, zero financial risk
- Biotin supports nail plate keratin synthesis — stronger nails
- Zinc reduces nail brittleness and splitting
- Omega-3s support paw pad skin barrier and coat quality
- 25 vitamins + 15 probiotics — covers the full nutritional base
- 200,000+ dogs using daily
- Nutritional results take 3–6 weeks to become visible in new nail growth
- Picky eaters may need 1–2 week introduction period
Frequently Asked Questions: How to Trim Dog Nails
Stop Paying $85 Per Grooming Visit — Master It at Home
The complete home nail care system: Bailey’s CBD 30–60 min before for anxious dogs → sharp plier-style clippers → 45-degree tip cut → styptic powder on standby → smooth with grinder → Ruff Greens daily for nail strength → Dutch Pet Rx calming medication for severe cases. Nail trimming can become the calmest 10 minutes of your grooming week.